My photography students often ask how to get water so flat on a photograph, how to create a mystic effect with water or how to let the clouds appear dynamic. In order to create such effects, it is necessary to work with the technique of long exposure. How does it work? Here’s a daylight long exposure photography tutorial covering all questions you might have in terms of long exposure special effects.

daylight long exposure

f/7.1 | 20 sec | 16 mm | ISO 100 | ND 1000

TABLE OF CONTENT

1. Some basics about exposure time

Before I jump into long exposure photography I’d like to give you some basics of shutter speed. 

What is shutter speed?

Exposure time (also called shutter speed) is the period of time during which the camera shutter is open to allow light to pass through the lens and onto the sensor. 

The longer the shutter speed, the more light falls on the sensor. This also means that the darker the environment, the longer the exposure time must be. On the other hand, in bright daylight a short exposure time is sufficient.

The exposure time is displayed in fractions of a second and seconds:

exposure time

What does the exposure time do?

The shutter speed is not only an important camera setting to expose the subject sufficiently and well but a true wizard for you to really express your creativity. Exposure time affects whether your moving subject is frozen or blurred.

If you choose a short exposure time (e.g. 1/250 s), moving subjects freeze in their motion. With a short exposure time (e.g. 1/2000) you can also freeze water and even see every single drop.

f/5.6 | 1/500 sec | 200 mm | ISO 100

If you choose a long shutter speed (e.g. 1/15 shutter speed), moving objects become blurred. It even goes as far as to make moving people disappear completely. When capturing water and you choose a long exposure time, it appears as a soft curtain (e.g. 1/8) or even completely smooth (e.g. from 2s). Using long shutter speed to achieve a certain effect can be described as long exposure photography.

f/7.1 | 1.6 sec | 70 mm | ISO 100 | ND 64

The difference of a waterfall with short and long shutter speed:

kurze Verschlusszeit
f/6.3 | 1/160 s | ISO 400 | 90 mm
lange Verschlusszeit
f/6.3 | 2,5 s | ISO 100 | 19 mm

2. Using ND filters

Now you’ve just heard that a long exposure time lets a lot of light fall on the sensor. If you want to take a long exposure shot during the day, it won’t work without a tool, because your image would only be a bright spot.

So you need a so-called ND filter. The ND filter is evenly darkened and reduces the amount of light falling on the sensor. There are different strengths of ND filters. You will usually find two specifications on them: The density and the factor of the exposure time. The most common models are ND8, ND64 and ND1000. With an ND 3.0 filter, the image darkens by 10 f-stops and you can expose 1000 times longer than under normal lighting conditions.

NiSi ND Filter

I recommend using the NiSi Filter system. The filters are made of optical glass with double sided Nano Coating technology. It is a high quality filter system for excellent photos. 

Get a 5% discount for the purchase of any NiSi Filters

Cool? Use the Code GONISI19 and grab your exclusive discount.

There are several ways to determine the exposure time when using an ND filter:

1. You shoot in live-view mode, which shows you what the image will look like on the display on the back of the camera. Turn the wheel to change the exposure time and observe on the display how the brightness changes. For Nikon models, you may need to set the exposure preview on to see the change. You can see how to do this in this video by Derek:

2. Calculate the exposure time using an app for iPhone or Android

3. Find the correct exposure time in this overview. Print and cut it out for your camera bag.

exposure time with nd filter

4. Calculate the exposure time using the formula Exposure Time x Filter Factor. An example: The exposure time without a filter would be 1/10 second and you shoot with an ND 3.0 filter. ND 3.0 filters have a factor of 1000, which means you multiply the 1/10 seconds by 1000 and get an exposure time of 100 seconds.

3. Some examples of daylight long exposure shots

Blurred clouds and an intense sunset light
f/8 | 91 sec | 31 mm | ISO 100 | ND 1000

daylight long exposure

Extremely flat water
f/10 | 68 sec | 17 mm | ISO 160 | ND 1000

Capture the movement and dynamic
f/6.3 | 6 sec | 35 mm | ISO 320 | ND 64

daylight long exposure

Giving the photo an arty touch. The water and the gondola almost look like a painting
f/7.1 | 2.5 sec | 84 mm | ISO 100 | ND 1000

Vienna Summerlocation Museumsquartier

Blur the fast moving clouds and make the people not recognizable 
f/9 | 25 sec | 19 mm | ISO 100 | ND 1000

4. A daylight long exposure photography tutorial: a step-by-step guide

In this step-by-step guide I will show you how exactly I approach a long exposure shot:

Step 1:
Mount your camera on the tripod and find the position from which you want to photograph your subject. Make sure the tripod is stable. If it’s windy, hang your backpack on the tripod’s hooks to make it more stable. Look through the viewfinder and adjust the tripod in order to get your desired image frame. 

Step 2:
Turn the function wheel to M (manual exposure setting) and then select the aperture you wish to use to shoot your subject. In landscape photography, it’s best to choose an aperture between f/8 and f/13. If you need help with manual exposure, read my article explaining the basics of manual exposure. 

Step 3:
Now set the shutter release to 2 seconds. The two seconds lead time gives the tripod with the camera the time to recover from the manual shutter release. This prevents camera shake. Instead of the self-timer, you can also use remote control.

Step 4:
Turn off the image stabilizer on your lens. The stabilizer compensates for camera shake. If you take pictures with a tripod, it may be responsible for the slight blurring of your pictures. 

Step 5:
If you shoot with an ND 3.0 filter, i.e. expose 1000 times longer, I recommend that you also activate mirror lock-up on SLR cameras. 

Step 6: 
Switch to live-view and set the focus point to the desired position. Usually, the focus for landscapes is about at one-third of the picture. As soon as you press the shutter button halfway, the camera measures the exposure. Look at the exposure meter and adjust the exposure time until the arrow on the scale is on zero. That would be the exposure time you need without ND filter for correct exposure – assuming that the lighting conditions are “normal” and there are no major differences between light and dark. 

Step 7:
Screw the ND filter onto the lens. Now you don’t see anything on the display. Turn the wheel again for the exposure time until you can see your image on the display. When it has the desired brightness, release the shutter. For Nikon models, you may need to set the exposure preview on – see the link in the Using ND Filter section for instructions. 

The live-view allows you to change your image framing despite the ND filter being applied or to set the focus differently. Try multiple shots of your subject with minimal changes in exposure times. 

daylight long exposure

f/5.6 | 5 sec | 20 mm | ISO 100 | ND 1000

Need to cover the basics first?

Then head over to my article covering 7 amazing tipps how to learn photography the easy way.

5. Bulb mode: expose longer than 30 seconds

When photographing in the dawn and using an ND filter, 30 seconds of exposure may not be enough.  Don’t worry – of course, 30 seconds isn’t the end of what your camera can do. There’s the bulb mode for longer exposure times – find the B on the function wheel. When shooting in B mode, the shutter remains open as long as you hold the shutter button. This allows long exposures of up to several hours. However, bulb mode should only be operated with a remote control or remote shutter release. 

And here’s the step-by-step tutorial for shooting in bulb mode:

Step 1:
This step remains the same as above – mount the camera on the tripod and find your image framing.

Step 2:
Turn the function wheel to B, the bulb mode and then select the aperture with which you want to shoot your scenery. 

Step 3:
Now set the drive mode to 2 seconds to use the remote control or remote shutter release.

Step 4:
Turn off the image stabilizer on your lens. The stabilizer compensates for camera shake. If you shoot with a tripod, it may be responsible for a slight blurring of your images. 

Step 5:
If you shoot with an ND 3.0 filter, i.e. expose 1000 times longer, I recommend that you also activate mirror lock-up for SLR cameras. 

Step 6: 
Switch to live-view, change to manual focus, and set the focus point at the desired position. Usually, you focus about a third of the way into the picture for landscapes. Press the magnifying glass with the + and turn the focus ring until your subject is in focus. As soon as you press the shutter button halfway, the camera measures the exposure. Look at the scale and turn the exposure time until the arrow on the scale is at zero. This would be the exposure time you need without ND filter for correct exposure based on the assumption that the lighting conditions are “normal” and there are no large variations between bright and dark. 

Step 7:
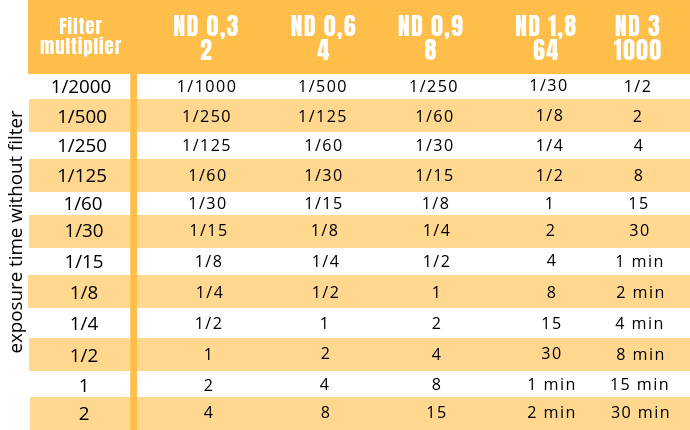
Screw the ND filter onto the lens and calculate the exposure time using the above tools. In the beginning, the app may be the easiest to use. Press the shutter button on the remote control, stop the time and press the shutter button again as soon as the calculated time is reached. What is the result? It may take a few attempts to get the perfect exposure. But you get a good feeling over time and at some point, you don’t even need an app anymore, but set the time according to your intuition. 

day light long exposure

f/10 | 203 sec | 23 mm | ISO 200 | ND 1000

Three additional tips for long exposure photos: 

With very long exposures, hot pixels might appear. These are red and blue dots in your image. Cover the viewfinder with the viewfinder cap that is usually attached to the camera strap. This prevents light from entering the viewfinder. In astrophotography, so-called dark images, also known as dark frames, are taken to avoid hot pixels. You take a dark picture by covering the lens with the lens cap and exposing it for as long as the original image. It’s a good idea to take three dark shots before and three dark shots after shooting.

The cameras have the option of noise reduction for long exposures. I always turn this option off because this reduction takes as long as the actual exposure. 

Note that some ND 1000 filters can cause colour casts. I have not noticed that with the NiSi 1000. Shoot your images in RAW to be able to correct any colour casts in post-processing. 

7. Long exposure shots of people

A long exposure does not always mean to expose several seconds. We also talk about long exposure from 1/15 of a second. For humans 1/15 second is very short, for the camera, however, it is quite long. When you photograph a person in motion with a 1/15 s, the person will appear blurred. 

Long exposure shots are great to demonstrate the dynamics of people in an image. If you photograph a stunning building, make sure to catch blurry people in it. People rushing around in the city are a good subject if you make them look blurry.  

Are you travelling and would like to take a picture of a well-known sight without people? Then screw the ND filter onto your lens and expose until the people are ” magically ” out of the picture. However, this only works when people move. Since Instagram and the selfie-thing, this technique doesn’t work anymore because there are always people standing still taking selfies 😉 

f/11 | 20 s | ISO 100 | 105 mm | ND 1000